Feb 19 2017

CakeSpinner

Category: Lego,TechnicsSpiller @ 02:58


I was looking through my Lego folders and found this 5 years old creation. I don’t quite remember why I made this, but it was probably to improve my earlier large turntable design to 8 wheels instead of 4. The small Technic turntables just aren’t strong enough to balance a huge construction, so using wheels was a good and simple solution.

It is a rotating design where all 8 wheels are powered. I quite like it, but since the 42055 Bucket Wheel Excavator introduced the perfect part for large turntables (and quite a few of them) I will probably use that in the future. (And that was an amazing set, especially at 50 % off.)


Of some reason I though of making a rotating cake plate would be funny, so I added a flat top and this ended up being the result.


May 04 2015

6×6 off-roader

Category: Lego,Mindstorms,TechnicsSpiller @ 22:17

I have been meaning to get this out a long time ago, but this model was characterized by delays, long delays.
Alternative front view Back view
This was supposed to be a quick attempt on making a 6 wheeled vehicle with steering on both front and back wheels, and all wheels having power. My initial model is a clear indication of my ambitions with this project:
First prototype
Somewhere along the road I decided to try to add pendular suspension and it slowly turned into a full blown project. Then I started delaying the project, with me not even touching it for periods of up to 6 months.

The steering module is the most important part of the build, with steering and drive being controlled from each side of the axle it suspends on. I tried to keep it small and strong, while including a differential. I tried to figure out how to get the power through the steering, but I didn’t manage to find a solution which was small enough, so I ended up using those Universal Joints. It is not a good solution, as only a little bit of friction actually holds the wheel in place.
Pendular module with steering Steering
To improve the amount of distance the suspension can work with, I made the connection to the spring so it can detach when the spring on the other side is being pressed together.
drop suspension Suspension example, diagonal view
Suspension example, front view Suspension example, side view

To keep the overall height of the model down, I placed the NXT motors between the modules, which worked rather well. As a side effect it also gave the build a very low center of gravity. One thing which required special attention was to keep a smooth surface to prevent the modules getting stuck on the motors.
The modules and motor drive
I do really hate the shape of the NXT motors though, it makes them nearly impossible to incorporate them into a space-efficient model.

All in all, I can’t really say I’m satisfied with the build. While the entire model is very robust, the wheels can easily pop off making the strength of the rest of the model kinda pointless. Also the suspension on the middle wheels should really have been something else than pendular suspension, as it causes the front or back wheels to lift off the ground.
One of my goals with the project was to learn how to do wireless bluetooth communication in C++ from my computer to the NXT. I did succeed, but I never got it polished up with joystick support as I wanted…

No webgl

Download LDraw file here


Feb 16 2013

Headphone stand

Category: Lego,TechnicsSpiller @ 17:31

The wires on my headphones kept breaking, so I decided to buy a set of wireless ones. The I bought the Sennheiser RS 160 which uses a portable transmitter, instead of the larger stationary RS 170. However the RS 170 transmitter duals as a headphone stand (and charger) and I would like to have some way of safely storing my headphones, so I built a stand in Lego Technics.

I had two ambitions, to make it look a bit more fancy than what I usually build and to mainly use pieces that I rarely use (as otherwise I would probably disassemble it if I needed them). When I noticed that large box with angled beams I never use, it seemed perfect for this.

Headphone stand made with Lego Technics

In the end it just became two plates with 4 straight beams built using angled beams, but I still think it gives it a nice touch.

The beams are not locked and are free to move, which should make the stand very unstable, however it is not. Partially because of the friction pins, but mainly because the beams are each placed at a slightly different angles than the others. So when the top plate wants to move in one direction, one of the beams will restrict this movement as the angle is slightly off. It is not perfect, but as long as you are not rough with it, it stands.

Tags: ,


Nov 03 2012

NXT console v0.1

Category: Lego,Mindstorms,NXC,Programs,SoftwareSpiller @ 20:27

A long time ago on Mindboards some talk was made about displaying text-output like how it is done in a console, but I never ended up writing any code. Since it have been quite some while since I last wrote anything in NXC, I did this as a quick brush-up project.

Supports scrolling up and down with the left and right button on the NXT, and supports the control characters ‘\n’, ‘\t’, ‘\a’ and ‘\b’. ‘\b’ only works on the text you are currently adding though.

Download:

NXT console v0.1


Jun 19 2012

RICcreator – pugixml

Category: Lego,Mindstorms,Programs,RICcreator,SoftwareSpiller @ 01:22

Since I’m not working actively on RICcreator in the moment, not much have happened the last few months, however I just rewrote some terrible code which was not safe. RICcreator would crash if the settings.xml file is formed differently than expected, so when a new version changed the format, it would crash if the old .xml file was kept.

XML handling

The XML parser previously used was rapidXML which promises great performance, and since I want to do some game related programming with XML I wanted to learn the API. However as I tried to use it with RICcreator I quickly realized it was rather tedious to work with. So I slacked on the implementation. Most importantly, I didn’t do any validation and simply chained the node lookups. So for example to get to the “settings” node in the “RICcreator” node I did this:

doc.first_node( "RICCreator" )->first_node( "settings" )

However if first_node() can’t find the node it returns NULL and in case of this the second call will try to dereference a NULL pointer and crash the application. To avoid this it should have been done like this:

xml_node<>* root = doc.first_node( "RICcreator" );
if( root ){
  xml_node<>* settings = root->first_node( "settings" );
  if( settings ){
    //Process it here
  }
}

This is quite some code for a simple lookup, so as said I slacked. Adding nodes to a new document (when saving the settings) was even more tedious as you had to allocate nodes and then add them. (On the other hand, I couldn’t slack here.)

So I have been looking for a simpler C++ XML parser and recently I heard about pugixml. I like the API much better, it is also a lightweight parser and apparently even faster than rapidXML so I tried it out. The previous lookup would look like this in pugixml:

doc.child( "RICCreator" ).child( "settings" )

This doesn’t share the problem rapidXML has, because child() returns a “NULL” object on failure. The NULL objects functions all return another NULL object, so you can chaining like this is completely safe as long as you check the final result.

So I have rewritten all XML handling to use pugixml now and I’m quite happy with the result. The code is a lot prettier and most importantly, it shouldn’t be able to crash like before.

Other changes

The dithering have been changed to use Filter Lite instead of  Floyd-Steinberg, which produces nearly as good result but which is quite simpler (and therefore faster).

A fun addition is grayscale importing support. If you want to toy around with grayscale images on your NXT, RICcreator makes this easy by letting you import the same image several times with different thresholds in one step.

The Number opcode is now no longer aligned to multiples of 8, as this limitation has been removed in the enhanced firmware.

A few bugs have been fixed and it should be possible to compile in Visual Studio again. (I haven’t checked after rewriting the XML stuff though.)

Download

Revision 165 win32: RICcreator rev. 165 – win32.zip

Revision 165 source:  RICcreator rev. 165 – src.zip

Tags: , ,


May 01 2012

XOR gate

Category: Lego,TechnicsSpiller @ 09:08

As I mentioned in Mechanic NOR gate I was working on extending the NOR-gate to a compact XOR-gate and I finally succeeded in making a prototype of it.

My original idea to make it smaller failed, however after trying to think outside the box for a bit I finally made a breakthrough. Keshav Saharia made an AND-gate by surrounding an OR-gate with NOT-gates. I realized that this can be achieved by modifying an OR-gate slightly. Instead of enforcing the output to be true when one input is, you can get the AND-gate result by enforcing that the output is false when at least one input is too. Instead of pushing the output beam on true inputs, you pull it on false input like shown in the example AND-gate design below:

AND gate

With this much smaller AND-gate it becomes a whole lot easier to create a compact XOR-gate. My prototype as shown below contains two layers, one layer contains 2 AND-gates and one OR-gate while the bottom layer is a single NOT-gate.

Top view of XOR gate Bottom view of XOR gate

The reason I call this a prototype is that it contains the same flaw as Keshav Saharia’s XOR-gate, it does not reset its internal gates when a state updates. This could be solved by using rubber-bands like I did with my NOR-gate design. However I believe this approach to logic gate design is flawed and since it is difficult to do add this without increasing the size (and work well) I wouldn’t even bother.

The issue is that friction will continue to build up in the system when you start combining the gates, and those rubber bands makes it much worse. (I also fear that the rubber bands in one gate might affect another gate.) It is limited how much force these gates can function with. Small inaccuracies in how much the axles extend will also propagate throughout the system.

All those issues limits the amount of gates you can chain together and I don’t think it would perform well enough to complete a 4-bit adder (using half/full-adders).

So I want to try a completely different approach using continually rotational power as inputs and using gears to create the gates. One of the advantages is that gears can handle much much larger power throughput than the axle-beams approach. Secondly, by making it continuous you can more easily supply more power by embedding motors in the gates. The big disadvantage however is that it will use much more space and therefore also pieces. However if I can get it to work and I believe it will scale well I will try to get the gears/parts required.


Feb 29 2012

New site and status update

Category: Lego,Mindstorms,Programs,RICcreator,Software,StepmaniaSpiller @ 20:28

The time has finally come where I ventured out in the myriad of paid hosting providers. Free hosting isn’t really worth it and WordPress.com doesn’t allow you to do anything (without paying buckets). WordPress.com is fine if you just want to have a blog, however as a CS student I want to mess with everything. So I tried a local hosting provider and we will see how this goes…

Status on RICcreator

I haven’t had the time to develop on this for quite some time but I can do some work on this regularly now.  However I’m not going to do that. While far from perfect, RICcreator have matured and I do no longer feel the need to use nxtRICeditv2 anymore. I haven’t even started the program up in months as I’m using RICcreator for everything RIC related now.

As I’m not seeing people use it I will simply fix bugs and add features when I want the functionality. So while not dropped, development will be slow. I will still fix bugs if anyone reports them and I’m open for feature suggestions. I will do one more release which probably will be the last major update for a while.

While I want to move my focus to other things, RICcreator marks an important milestone for me: I am now creating software which I find useful enough to use in my everyday life. RICcreator is my first medium-sized application and I’m quite satisfied with the result.

What I have been doing the last few months

Superus

I was working on in a project group for a project for CS at university, however 4 out of 7 people in the group decided to drop out of CS. So the lone 3 remainders had to write 80 pages in 2 weeks, which worn me out a bit. Anyway, the project was about image editing and we wrote a couple C programs to do several functions. The code is made available at SourceForge as Superus.

It uses a command line interface and only accept PPM input/output so it might not be that useful for many, however it can read 16-bit PPM, edit it in 64-bit float and save it as 8/16-bit using dithering to ensure maximum quality. So it is possible to do certain things which simple isn’t currently possible in GIMP. (It should also be gamma-correct unless we screwed up on the conversions.)

I have written about half of the code, the parts which handle PPM input/output, image representation (how it is stored and worked with internally in the programs), scaling, brightness, blurring/sharpening and various filters. “nielssonnich” wrote the Command line interface and scripting code.

I might continue to do some experiments with this codebase, but it should be considered to be a one-shot project though. I might also write a post about one of the cases where I had to use Superus instead of GIMP to achieve the results I wanted.

BPM graphing

I wrote a small quick program to graph the BPM changes in a .sm chart for DDR rhythmic games which you can read more about here: BPM graphing [Thirdstyle]

I was in the process of porting it to PHP but I didn’t finish it. However I want to finish it soon as I have some bigger plans (see below) which I hopefully will start on in the summer vacation. It shouldn’t be more than 1-2 days work anyway…

What I’m doing now

I have started on a new project for CS with a new group and our goal is to create a spell checker which can correct grammatical errors in Danish. We have not yet decided whether we will try to parse sentences or try to make something like a neural network, but nevertheless this will be a challenging and interesting project.

Another thing I’m working on is a custom theme for this blog. Now that I’m not limited by WordPress.com I can write my own PHP code so I can achieve just want I want. I’m going to take my sweet time on this as it is low on my priority list.

LDraw viewer

At university we are taught C#, however the exercises are quite boring as we have to write some random code which does nothing more exciting than a “Hello, World!” program. So instead I will be working on a project I wanted to do for nearly a year now, a LDraw viewer. It should load a LDraw CAD model and display it on the screen using OpenGL for the graphics.

I’m obviously not trying to create something special here, as there are already several software out there which has similar functionality. This is purely a study project and in particular I want to get a good grip on OpenGL and 3D graphics. However since I also want to cooperate this into my education I will be writing it in C#, to get some proper experience in it. I haven’t written any code so far, but I will do so within a weeks time.

NXT RPG

You heard right, I haven’t forgotten about this project. It pains me that I have not completed the ‘level 2’ mode which contains the battles, so I want to do something about that. I might do a bit of work on it from time to time, but don’t expect sudden rapid development on it ; )
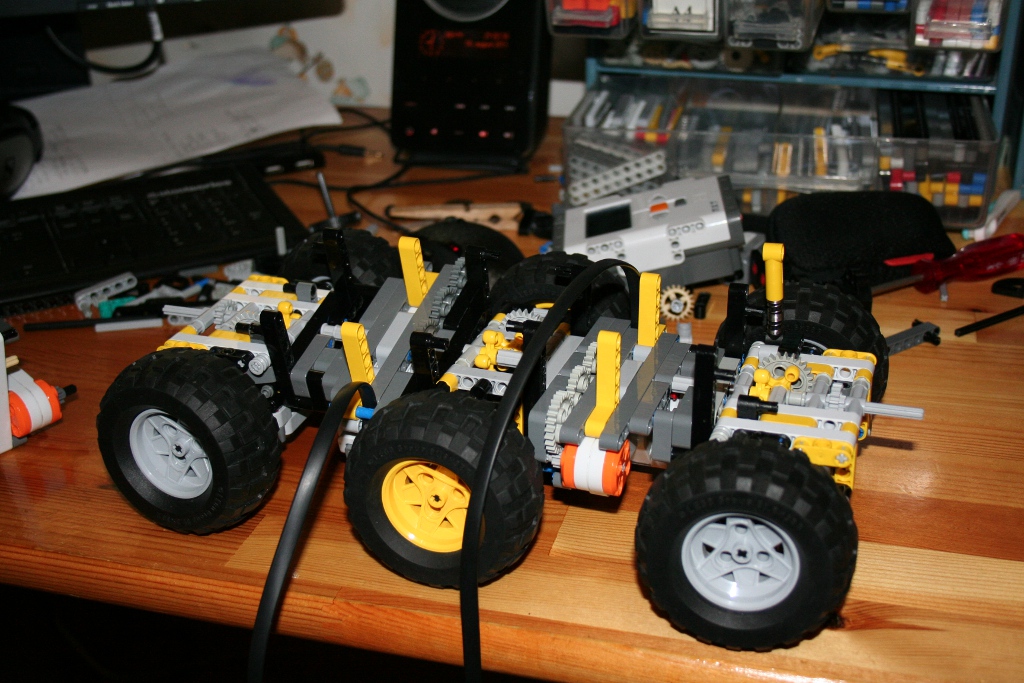
6wd Off-roader

I’m still not done with this project, however I’m almost finished now. Just missing a bit of reinforcing of the mechanics and improving my software and I will call it done, I want to move on after all.

What I will do in the future

DDR for keyboarders

One of the project ideas I have on my Projects plan page and I will attempt to start on it this summer. (This was why I did the BPM graphing thing.) I’m been playing Stepmania for 4-5 years now however I absolutely hate the engine. It is slow, buggy, old-fashioned and straightforward annoying. I want to try making an engine which is very different in a lot of points but which still keeps the good old game play.

This is a very ambitious project and I might not end up with anything useful. However I want to challenge myself even further and I want to tell the community that there are people out here that wants to move on from the old DDR arcade days.

This is definitely a large project and I have to make use of a lot of technologies and techniques I haven’t used on the PC before, only with NXT or PHP. OpenGL, threading, databases and perhaps even some driver interaction stuff.

Conclusion

There is really a lot of stuff I want to do and not really that much time. Can I pull all this off without going overdue? Probably not, but I will really want to try my hardest to arrange my time so I will complete everything. I tend to waste a lot of my time doing random stuff which is really a shame when there is so much I want to do.


Jan 30 2012

Linear 4-finger grabber

Category: Lego,TechnicsSpiller @ 20:02

I originally made this design for a small scale pneumatic robotic arm which included a multiplexed pneumatic control station. I here present you a revamped version of it:
Photo of grabber

LDraw file

This design works with both with pneumatics and linear accumulators. The tubing will be a bit tight for the pneumatic version, but if you are worried you can just remove the axle which is in the way. It might also work with the small pneumatic piston which would create a very compact design however I don’t have one of those so I can’t try it out.

In the design each finger is a section of its own and every section is completely the same, just rotated 90 degrees each. I like it as it is something I rarely see in Technic models; mirroring is quite common however rotating is much less seen.

Tags: , , ,


Jan 29 2012

Mechanic NOR gate

Category: LDraw,Lego,TechnicsSpiller @ 19:20

Several years ago I tinkered around with making mechanic logic gates, so the LEGO Answers question: Is it possible to build simple logic gates with LEGO mechanics? caught my interest.

Keshav Saharia blog post Mechanical computation from Lego bricks was interesting, but I was not quite satisfied with his NOR gate. First of all the OR gate in it looks rather shabby in my opinion but most importantly it does not reset its state. It starts out in the TRUE position, but when an input becomes TRUE and the output becomes FALSE it will stay FALSE even it the input changes back to FALSE again. So I wanted to try making my own version based on Keshav´s design and the result is shown below:

Top view of my NOR gate  Bottom view of my NOR gate

(CAD file available, I just can’t upload it to WordPress and Brickshelf appears down at the moment.)

My version is a bit smaller as the frame is 6×8 instead of Keshav´s 6×10, but it does use a few more pieces. I’m not quite satisfied with my OR gate either as I’m not sure how much force it can transfer before becoming unreliable.

A rubber band have been added so the gate properly resets itself however it does create a new problem, more force is needed to go through the input in order to operate the gate. This is not a problem with just one gate, but imagine 10 of these stacked together and this force will become rather large.

So I believe that the axle approach will always be limited with that, because while most gates pushes, insert a NOT gate and it will start pulling which could pull the axle out of what might be connecting it.

I tried making an AND gate where the NOT gates are combined with the NOR gate (in order to make it smaller) but I didn’t succeed in making up a good design for the combined double NOT and OR gate. But inspiration have struck me and I have an idea how to make a XOR gate which will end up being about 6×12 and about 5-6 stud high. This will be my next goal.

Tags: , ,


Jan 28 2012

9392 Quad Bike – review

Category: Lego,TechnicsSpiller @ 20:38

One of the new Technic sets, the 9392 Quad Bike, looked rather interesting to me since it has 3 springs, chains links and that the price is low as it is a small set. So I went ahead and bought one.

Assembled Quad Bike

Building

The build was fairly straightforward and if you know what you are doing it shouldn’t cause much trouble. If you are new to Technic it might be a bit tricky at times I guess, as the chassis is constructed of angled beams in an way which isn’t straightforward and there are sub-modules which again isn’t always straightforward to combine with the main model. The instructions are however clear about these areas and does also at times include extra clarifying illustrations of the assembly to make sure you did it correctly.

I don’t like how the pieces were sorted in the backs though. There were a lot of cases were I thought it should be in one bag, but it actually was in the other. For example, the 3m Technic pin was not in the same bag as the 3m Technic pin with Stop Bush, which makes no sense at all. There were 3 bags and they were NOT ordered.

The unboxing and construction of the main model took just under a half hour.

The model’s construction

I was positively surprised of the construction of this model. I have previously been a bit disappointed with Lego’s newer models which just feels weak in my opinion. This model only contains 182 pieces (+26 chain links), yet it manages to impress me. I really like how the chassis is constructed by angled beams and how those angles are used to add details to the construction. I also like how the front is made, it manages to get a cool looking suspension with steering while keeping the piece count down.

There are a few things in the construction which isn’t optimal though. The motor block is rather loose but most importantly, the chassis hits the ground before the front suspension is fully compressed. While I could live with the first, the latter is definitively a flaw in the design.

At times the part usage appears a bit weird, for example a 4m axle with stop is used where a 4m axle without stop actually would have been better, but I guess it is to make the available parts better.

But all in all I like it as it packs a fair amount of features using only ~200 pieces and looks rather nice at the same time.

Parts

This sets contains a lot of angled beams, in fact it nearly doesn’t contain any straight beams at all. I rarely don’t use those parts though, in fact I have a whole box of them which I never touch.

The tires, springs, motor block and chain links are a good plus, but it would be nice if there had been 4 springs instead of 3, as this would have made it possible to create a fully suspended car.

The rest is pretty much just normal pieces, but most of them are only in the 1-3 amount so there is a great variety, including some more special pieces.

Conclusion

While there are a few flaws this is definitively a good set and worth buying. The model is cleverly constructed and packs a decent amount of features, at the cost of being a bit more tricky to build. There are about 210 parts in it which are rather varied which makes it a good buy if you have a few sets already and want to spice your collection up.

Tags:


Next Page »